

Flaxseed Porridge
This is my go-to breakfast that is fast to make, satisfying & is fully customizable.
This is the porridge that I personally load up with all the amazing anti-inflammatory spices

This is my go-to breakfast that is fast to make, satisfying & is fully customizable. This is the porridge that I personally load up with all the amazing anti-inflammatory spices
INGREDIENTS:
¼ cup freshly ground flaxseeds
1 cup + 2 tablespoons non-dairy milk
1 medium banana, mashed
pinch ground nutmeg
pinch fine grain sea salt
pinch ground turmeric
pinch ground cinnamon
pinch ground cardamon
pinch ground ginger
for topping: fresh berries, cut up apples, pears, really ANYTHING your heart desires in the moment or whatever yummy fruit you have laying around. Also great with nuts like walnuts, Brazil nuts, almonds etc.
pure maple syrup (if you'd like it a bit sweeter)
Add the porridge ingredients to a medium saucepan and whisk to combine. Heat over medium heat, stirring constantly, until the porridge comes to a low boil and thickens (about 3-5 minutes). Turn off the heat and transfer the porridge to a serving bowl. Top with your choice of toppings. Enjoy!
NOTES: 2 heaping tablespoons of whole flaxseeds should yield about ¼ cup of ground flaxseeds. There is a noticeable difference in freshly ground versus flax meal when it comes to binding properties. If possible, opt for grinding your own at home for the best texture.

Anti-Inflammatory, Warm & Hearty Soup (Perfect for Chilly Autumn Days)
Anti-inflammatory, hearty & warming soup. Perfect on a cool autumn day.
Anti-Inflammatory, Warm & Hearty Soup
I love the fall. It is my FAVORITE season. We all get to snuggle a little closer, wear warm leggings & have more time for self-reflection & self-care. I love preparing warm & hearty foods in the fall & winter and this soup is one of my favorites. Enjoy
INGREDIENTS
For the Meatballs
1.5 pounds ground beef (I get all of my meat from ButcherBox - the cleanest source for organic chicken, grass-fed beef, seafood & more)
3 tablespoons freshly parsley finely chopped
salt and pepper to taste
For the Soup
1 large onion diced
1 large carrot diced
2 small stalks of celery diced
3 small organic golden potatoes - small dice
4 cloves of garlic minced (let it sit for at least 10 minutes before adding to your pot to get all the benefits of garlic!)
8 cups of home made or store bought bone broth
1 inch turmeric root minced on a microplane
1/2 inch ginger root minced on a microplane
salt and pepper
few strands of saffron (can you believe the amazing benefits of saffron? anti-inflammatory, anti-anxiety & more!)
juice of half a lemon
INSTRUCTIONS
Turn on your oven and heat up to 450-degrees.
While the oven is pre-heating, heat up your pot to medium heat. ( I love my dutch oven)
Add avocado oil, then add the onions, carrots and celery to your pot and let them cook for about 7-10 minutes until you are seeing a nice brown color
Meanwhile combine ground beef, parsley, milk, salt and pepper in a bowl. Combine mixture with your hands until just mixed, do not over mix or you will end up having dense meatballs.
Prepare a sheet pan with parchment paper, NOT foil
Use a tablespoon, melon baller, or small ice cream scoop to shape the meatballs. Do not make them too smooth, the rigid edges will allow for better browning in the oven.
Place meatballs into the oven and let cook for 15 minutes.
Back to the soup. Open the lid and add in the potatoes, the garlic, turmeric & ginger for just A MINUTE! Do not let garlic burn. This is where anti-inflammatory properties of this powerful trio takes place!
Add bone broth after a minute of garlic having to brown. Bring to boil, then allow to simmer.
Once the meatballs are done add them into the soup and let cook for another 15-20 minutes on a nice simmer.
Add a few strand of saffron
Adjust for seasoning with salt & pepper and finish it off with a squirt or two of lemon. I always feel that it adds a pop of freshness.
Add parsley, chives & cilantro for toppings or any of your favorites
Slurp, enjoy & repeat!

Plantain Pancakes #GlutenFree #GrainFree #DairyFree #EggFree
I thought I would have to give up my pancake love since my illness, but all was not lost yet. I have found this AMAZING, fluffy & naturally sweet pancake recipe & it is game changer. I mean I’m so happy I can now again eat pancakes!
Plantain Pancakes #GlutenFree #GrainFree #DairyFree #EggFree

I thought I would have to give up my pancake love since my illness, but all was not lost yet. I have found this AMAZING, fluffy & naturally sweet pancake recipe & it is game changer. I mean I’m so happy I can now again eat pancakes!
Ingredients:
2-3 green plantains ( either 2 big one or 3 smaller ones)
1/2 cup of coconut oil (melted) + more for greasing the pan
2 cups filtered water
2 teaspoons gelatin
1 teaspoon salt
1/2 arrowroot flour
Instructions:
Peel & chop plantains
Place all ingredients in a high speed blender or food processor
Blend & pulse until the batter is uniform & smooth. You want the batter to be thick but pourable
Heat a large pan with coconut oil on medium to low heat. I used this marble pan as it’s toxin free
Using a 1/4 measuring cup, cook pancakes in small batches, flipping when the batter begins to bubble. You may need to play around with the intensity of your stove top. I kept mine medium to medium low so they cook fully without burning.
Serve, eat & repeat!
These are amazing! Let me know how your turns out :)

Natural Weed Killer with Essential Oils #NaturalGardening #WeedKiller #EssentialOils
Gardening season is upon us! Use this simple, natural & effective weed killer around your garden
Natural Weed Killer with Essential Oils

I’m SUPER excited about the upcoming gardening season. I’ve started some of my seeds back in February and it was a nice break from the cold and depressing weather we’ve been having.
As I’m always learning new tools & strategies in the garden, the more natural the better, so I ran across this recipe for a natural weed killer and wanted to share it with you. I love essential oils and use it in my home almost daily. I realize the power it has to transform, so I’m super excited to try this recipe this year to kill weeds in the garden without hurting my produce.
Ingredients:
16 oz. glass spray bottle
14 oz. distilled vinegar
1 1/3 liquid Castile soap
3 drops of wintergreen essential oil
3 drops of clove essential oil
3 drops of cinnamon essential oil
3 drops of orange essential oil
Instructions:
First put Essential Oils & soap into bottle & mix
Next pour in vinegar
Tighten lid & shake vigorously
Spray on weeds as needed

Recipe Credit: Organic Gardening by MamaZ

Lemon & Coconut Bars #GlutenFree #GrainFree #DairyFree #EggFree
Here is another delicious & tangy dessert that’s perfect on a hot summer day or if you love sweet & sour things like me! :) Enjoy!
Lemon & Coconut Bars

Here is another delicious & tangy dessert that’s perfect on a hot summer day! Adopted from The Nutrient Dense Kitchen
Ingredients:
For the Crust:
1/2 cup of coconut butter, warmed (also known as coconut manna)
1/4 cup honey, warmed
2 tbsp coconut oil, warmed
1 tbsp fresh lemon juice
1 cup cassava flour
1/4 tsp baking soda
1/8 tsp sea salt
For the Filling:
2 tbsp lemon zest (from about 2 lemons)
1 1/2 cups fresh lemon juice (about 10 lemons)
2 3/4 cups applesauce
1/3 cup coconut oil, warmed
1 1/2 tbsp unflavored powdered gelatin
Finely shredded coconut flakes
Instructions:
Preheat oven to 350 degrees F
Line a 8x8-inch square baking dish with parchment paper
Combine coconut concentrate, honey, coconut oil & lemon juice in a food processor and pulse to combine or whisk to combine.
Put the cassava flour, baking soda & salt into a bowl and combine. Add this dry mixture to the food processor or mixing bowl and pulse or mix until combined. The mixture should be crumbly but evenly hydrated
Scoop the crust mixture into the baking dish. Use your hands or spatula to press the mixture to form an even layer on the bottom. Bake for 20 minutes or until turning golden brown. Set aside to cool
Put lemon zest, lemon juice, applesauce & coconut oil into a small saucepan and stir to combine. Sprinkle the gelatin on top and allow it to sit for 5 minutes, undisturbed, in order to let the gelatin thicken
Place the pan on very low heat and whisk gently while stirring constantly with a whisk to dissolve the gelatin. Continue until the mixture is lukewarm to the touch and the gelatin has completely dissolved. Do NOT use high heat or cook for any longer than is necessary
Pour the filling on top of the COOLED base and sprinkle evenly with coconut flakes. Place in the refrigirator, covered, to chill for a few hours or overnight.
Cut into squares and wrap well. Store in the fridge for up to 1 week (if that’s even possible! Mine was gone in 2) Serve at room temperature
I love this!!! Let me know how your turns out :)

Wild Blueberry Crumble #GlutenFree #GrainFree #DairyFree #EggFree
It’s been so long since I’ve allowed myself to venture into the world of desserts again ... in fear of messing up my good streak of a healthy diet free of gluten, dairy, eggs, soy, grains & other food sensitivities I found out I have and this crumble is exactly what I needed
Wild Blueberry Crumble

It’s been so long since I’ve allowed myself to venture into the world of desserts again ... in fear of messing up my good streak of a healthy diet free of gluten, dairy, eggs, soy, grains & other food sensitivities I found out I have and this crumble is exactly what I needed
Ingredients:
For the Filling:
6 cups of frozen wild blueberries
1 tablespoon lemon zest (from 1 large lemon)
1/4 cup fresh lemon juice
1 tablespoon coconut sugar
For the Crust:
2 cups cassava flour
1/4 cup coconut sugar
1 teaspoon ground cinnamon
1/2 teaspoon ground ginger
Pinch of Himalayan salt
1/2 cup of palm shortening, at room temperature
1 teaspoon vanilla powder
1/4 cup ice water
Instructions:
Preheat oven to 375 degrees F
In a 8x8-inch square baking dish combine the frozen blueberries, lemon zest, lemon juice & coconut sugar. Stir to combine. Set aside while you make the topping
Put the cassava flour, coconut sugar, cinnamon, ginger & salt into a bowl of a food processor and pulse to combine
Add the shortening to the food processor in large clumps. Sprinkle in vanilla powder. Lock the lid and pulse in quick on and off bursts until the shortening is dispersed into large granules. Do not overmix!
Add the ice water as you pulse again in quick bursts until the granules are pea-sized or smaller. Do not overmix or you’ll end up with dough. Your mixture should be dry & crumbly
Top the blueberry mixture with the crumble, using a spatula to spread it evenly. Bake for 45 minutes, or until the topping is browned
Allow to cool for at least 15 minutes before serving!
This was a big hit in our house! Let me know how your turns out :)

Green Juice HomeMade Gummies Recipe
Do your kids love the sticky gummy bears but you don’t love all the processed junk in them? Here is the perfect home made gummy bears that your kids will love :)
Green Juice Home-Made Gummies Recipe
Time: 20 minutes, plus 1 hour to set in
Makes: 24 pieces
Ingredients:
1 cup green juice: celery, cucumber, apple, pear, pineapple etc. anything you like
1 tablespoon fresh lemon juice
1-3 tablespoons honey
3 tablespoons powdered unflavored gelatin
Equiptment:
Gummy bear molds or any other shallow mold
Instructions:
Make your green juice from whatever ingredients you’ve gathered in the juicer
Place green juice, lemon juice & honey into a small saucepan and whisk to combine. Sprinkle the gelatin on top evenly & set aside undisturbed for about 5 minutes until it swells as it absorbs the liquid
Then, place the pan on low heat and whisk gently for about 5 minutes until the mixture becomes thin and the gelatin completely dissolved
Pour liquid into gummy bear molds or other molds and refrigerate for about an hour to firm up
Remove the gummies from their molds & enjoy!


Honey & Dill Salmon

I absolutely LOVE salmon. I crave it! And if I could eat it every day, I totally would. It is so versatile too; you can have it for breakfast as lox on toast, for lunch on a salad or for dinner as a main dish. You can make it once and eat throughout the day or week. It's just simply amazing and the best thing it is SOOO simply to make.
And did we talk about salmon's benefits?
It is an excellent source of high-quality protein, vitamins and minerals (including potassium, selenium and vitamin B12) but it is their content of omega-3 fatty acids that receives the most attention. And in case you forgot what omega-3's are, they are these are essential oils (EPA and DHA) that contribute to healthy brain function ,the heart and the joints.
Now, there is always a lot of debate regarding whether to buy farmed or wild. To tell you the truth my opinion has been swayed towards wild for a while, because of all the bad rep farmed fish has gotten. But then I dug deeper into this and found out that buying farmed fish may not be so bad, because responsible farmers set high standards for their farmed salmon; and I think it tastes milder, but it is recommended to vary your options between wild and farmed.
So here is the recipe for this amazing salmon:
INGREDIENTS
- 2 lbs salmon
- 1/4 cup honey
- 3 cloves garlic, minced (or more! I love garlic for its taste and health benefits)
- 1 tablespoon grapeseed oil
- 1 tablespoon fresh dill leaves (or you can use dried dill weed)
- Himalayan salt and freshly ground black pepper, to taste
INSTRUCTIONS
- Preheat oven to 375 degrees F. Line a baking sheet with foil.
- In a small bowl, whisk together honey, garlic, olive oil, dill, salt and pepper
- Place salmon onto prepared baking sheet and fold up all 4 sides of the foil. Spoon the honey mixture over the salmon. Fold the sides of the foil over the salmon, covering completely and sealing the packet closed.
- Place into oven and bake until cooked through, about 15-20 minutes.
Garnish with some more fresh dill and prepare for an orgasm in your mouth!

Spinach Quinoa Feta Cakes & Cucumber Dill Yogurt Sauce
In my attempt to try and omit meat from our diets without the husband noticing, I made these and he had NO idea :) SCORE! Even my meat-loving 3 year old picky eater was saying "I want some more of these 'meat' cakes" haha

I'm always curious as to which foods are better eaten raw and which are better consumed cooked and for the longest time I thought spinach is best eaten raw, but did you know that it's actually better absorbed by the body COOKED? Cooking it actually increases its health benefits! Just like tomatoes!
Spinach has MANY health benefits, but my 3 favorites are:
1) Skin care - can relieve dry itchy skin if consumed on a regular bases. Need to get me a juicer. My birthday is coming up. Anyone? :)
2) Keeps you regular - its high fiber content, as well as water helps promote a healthy digestive tract. Yes, everybody poops!
So, here is a very delicious, nutritious & simple recipe to incorporate more spinach into your diet:
Ingredients:
Spinach Cakes
- 1 medium onion (I like the sweet onions) finely chopped
- 3 garlic cloves, finely chopped
- 6 oz chopped baby spinach
- 2 large eggs, beaten
- 1 1/4 cups of cooked quinoa
- 8 oz crumbled feta cheese
- 1 tbsp fresh chopped dill
- 1/4 tsp grated lemon zest
- 1/2 cups bread crumbs
- himalayan salt & pepper to taste
Cucumber Dill Yogurt Sauce
- 1 cup of plain TOTAL aka FULL FAT! Greek yogurt (FAGE is my FAVE!)
- 1 medium size finely chopped cucumber
- 2 tbsp of finely chopped scallions
- 2 tsps of fresh squeezed lemon juice
- 2 tsps of fresh chopped dill
- Salt & pepper
Directions:
1. Cook your quinoa according to directions. Usually, it's bring to boil, then reduce and simmer until a ring forms around it, drain and cool
2. Sautee onion for 2 minutes, add garlic until softened and fragrant. Mmmm, love this smell!
3. Add spinach and cook until wilted, about 4-5 minutes. Transfer the mixture to a bowl
4. Add the eggs, cooked quinoa, dill, feta, lemon zest, salt & pepper. Mix well. Add bread crumbs and let the mixture sit for a bit to absorb the moisture
5. Form round patties in your hand and line them up on a cutting board so they are all ready to be cooked.
6. Heat you skillet on medium-high heat and place the patties, in batches ( I did about 4-5 patties per round)
7. Grill them until they are browned about 4-5 minutes per side.
8. Serve with the yogurt sauce
Yogurt Sauce Directions:
1. Whisk together the yogurt, scallions, lemon juice, dill and cucumbers in a small bowl, season with salt & pepper and refrigerate to allow the flavors to mend. If you don't have time for this step, no worries, it's good as is :)
Enjoy!

Avocado Brownies
With my new sweet tooth, I needed to make some healthier desserts and these avocado brownies are just perfect! And talk about the chocolate goodness! Especially DARK chocolate.

Health Benefits of eating and baking with dark chocolate.
- Heart health - can help lower blood pressure by improving blood flow and may help prevent the formation of blood clots.
- Brain Health - increases blood flow to the brain as well as the heart, improving your cognitive function
- Makes you happy :) - Chocolate contains phenylethylamine (PEA), the same chemical your brain creates when you feel like you're falling in love. PEA encourages your brain to release endorphins, so eating dark chocolate will make you feel happier.
- Dark chocolate is loaded with antioxidants. Antioxidants help free your body of free radicals, which cause oxidative damage to cells.
- Dark chocolate contains theobromine, which has been shown to harden tooth enamel. That means that dark chocolate, unlike most other sweets, lowers your risk of getting cavities. And yes you still have to brush your teeth! (with natural Xylitol toothpaste of course)
- Cough suppressant - Theobromine is also a mild stimulant, though not as strong as caffeine. It can, however, help to suppress coughs.
- Dark chocolate helps keep your blood vessels healthy and your circulation unimpaired to protect against type 2 diabetes.
Health benefits of baking with avocados:
- It's a great way to reduce fat in your desserts: A 3.5-ounce serving of butter has a whopping 81 grams of fat compared to 14 grams in the same serving of avocado.
- By substituting avocado for butter, you'll be eliminating saturated fat from your desserts and replacing it with healthy fats.
- Avocados not only have a ton of vitamins, but they also may reduce cholesterol and fight heart disease.
So, here is the recipe for these amazing brownies and NO, they do not TASTE like avocados once finished
Ingredients:
- 2 large ripe avocados, mashed as well as you can (about 1 1/8 cups)
- 8 ounces high-quality dark chocolate, melted
- 1 cup granulated sugar
- 2 large eggs
- 1 teaspoon vanilla extract
- 3/4 cup all-purpose organic flour
- 1/4 cup unsweetened cocoa powder
- 1/2 teaspoon baking powder
- 1/4 teaspoon himalayan salt
- 3 tablespoons avocado oil
Directions
- Preheat oven to 350 degrees F. Liberally spray a 9-inch square pan with non-stick spray.
- In a large bowl, whisk mashed avocado and melt chocolate. Whisk in sugar until combined, then add in eggs and vanilla extract, mixing well. Add in flour, cocoa, baking powder and salt, mixing with a large spoon until JUST combined - do not over mix. Stir in avocado oil until it's well distributed and batter is somewhat smooth, then spread batter in pan. Bake for 28-32 minutes, or until middle is set. Remove and let cool completely, then frost and top with grated chocolate if desired.
Enjoy!

Kefir Cranberry & Apricot Cake
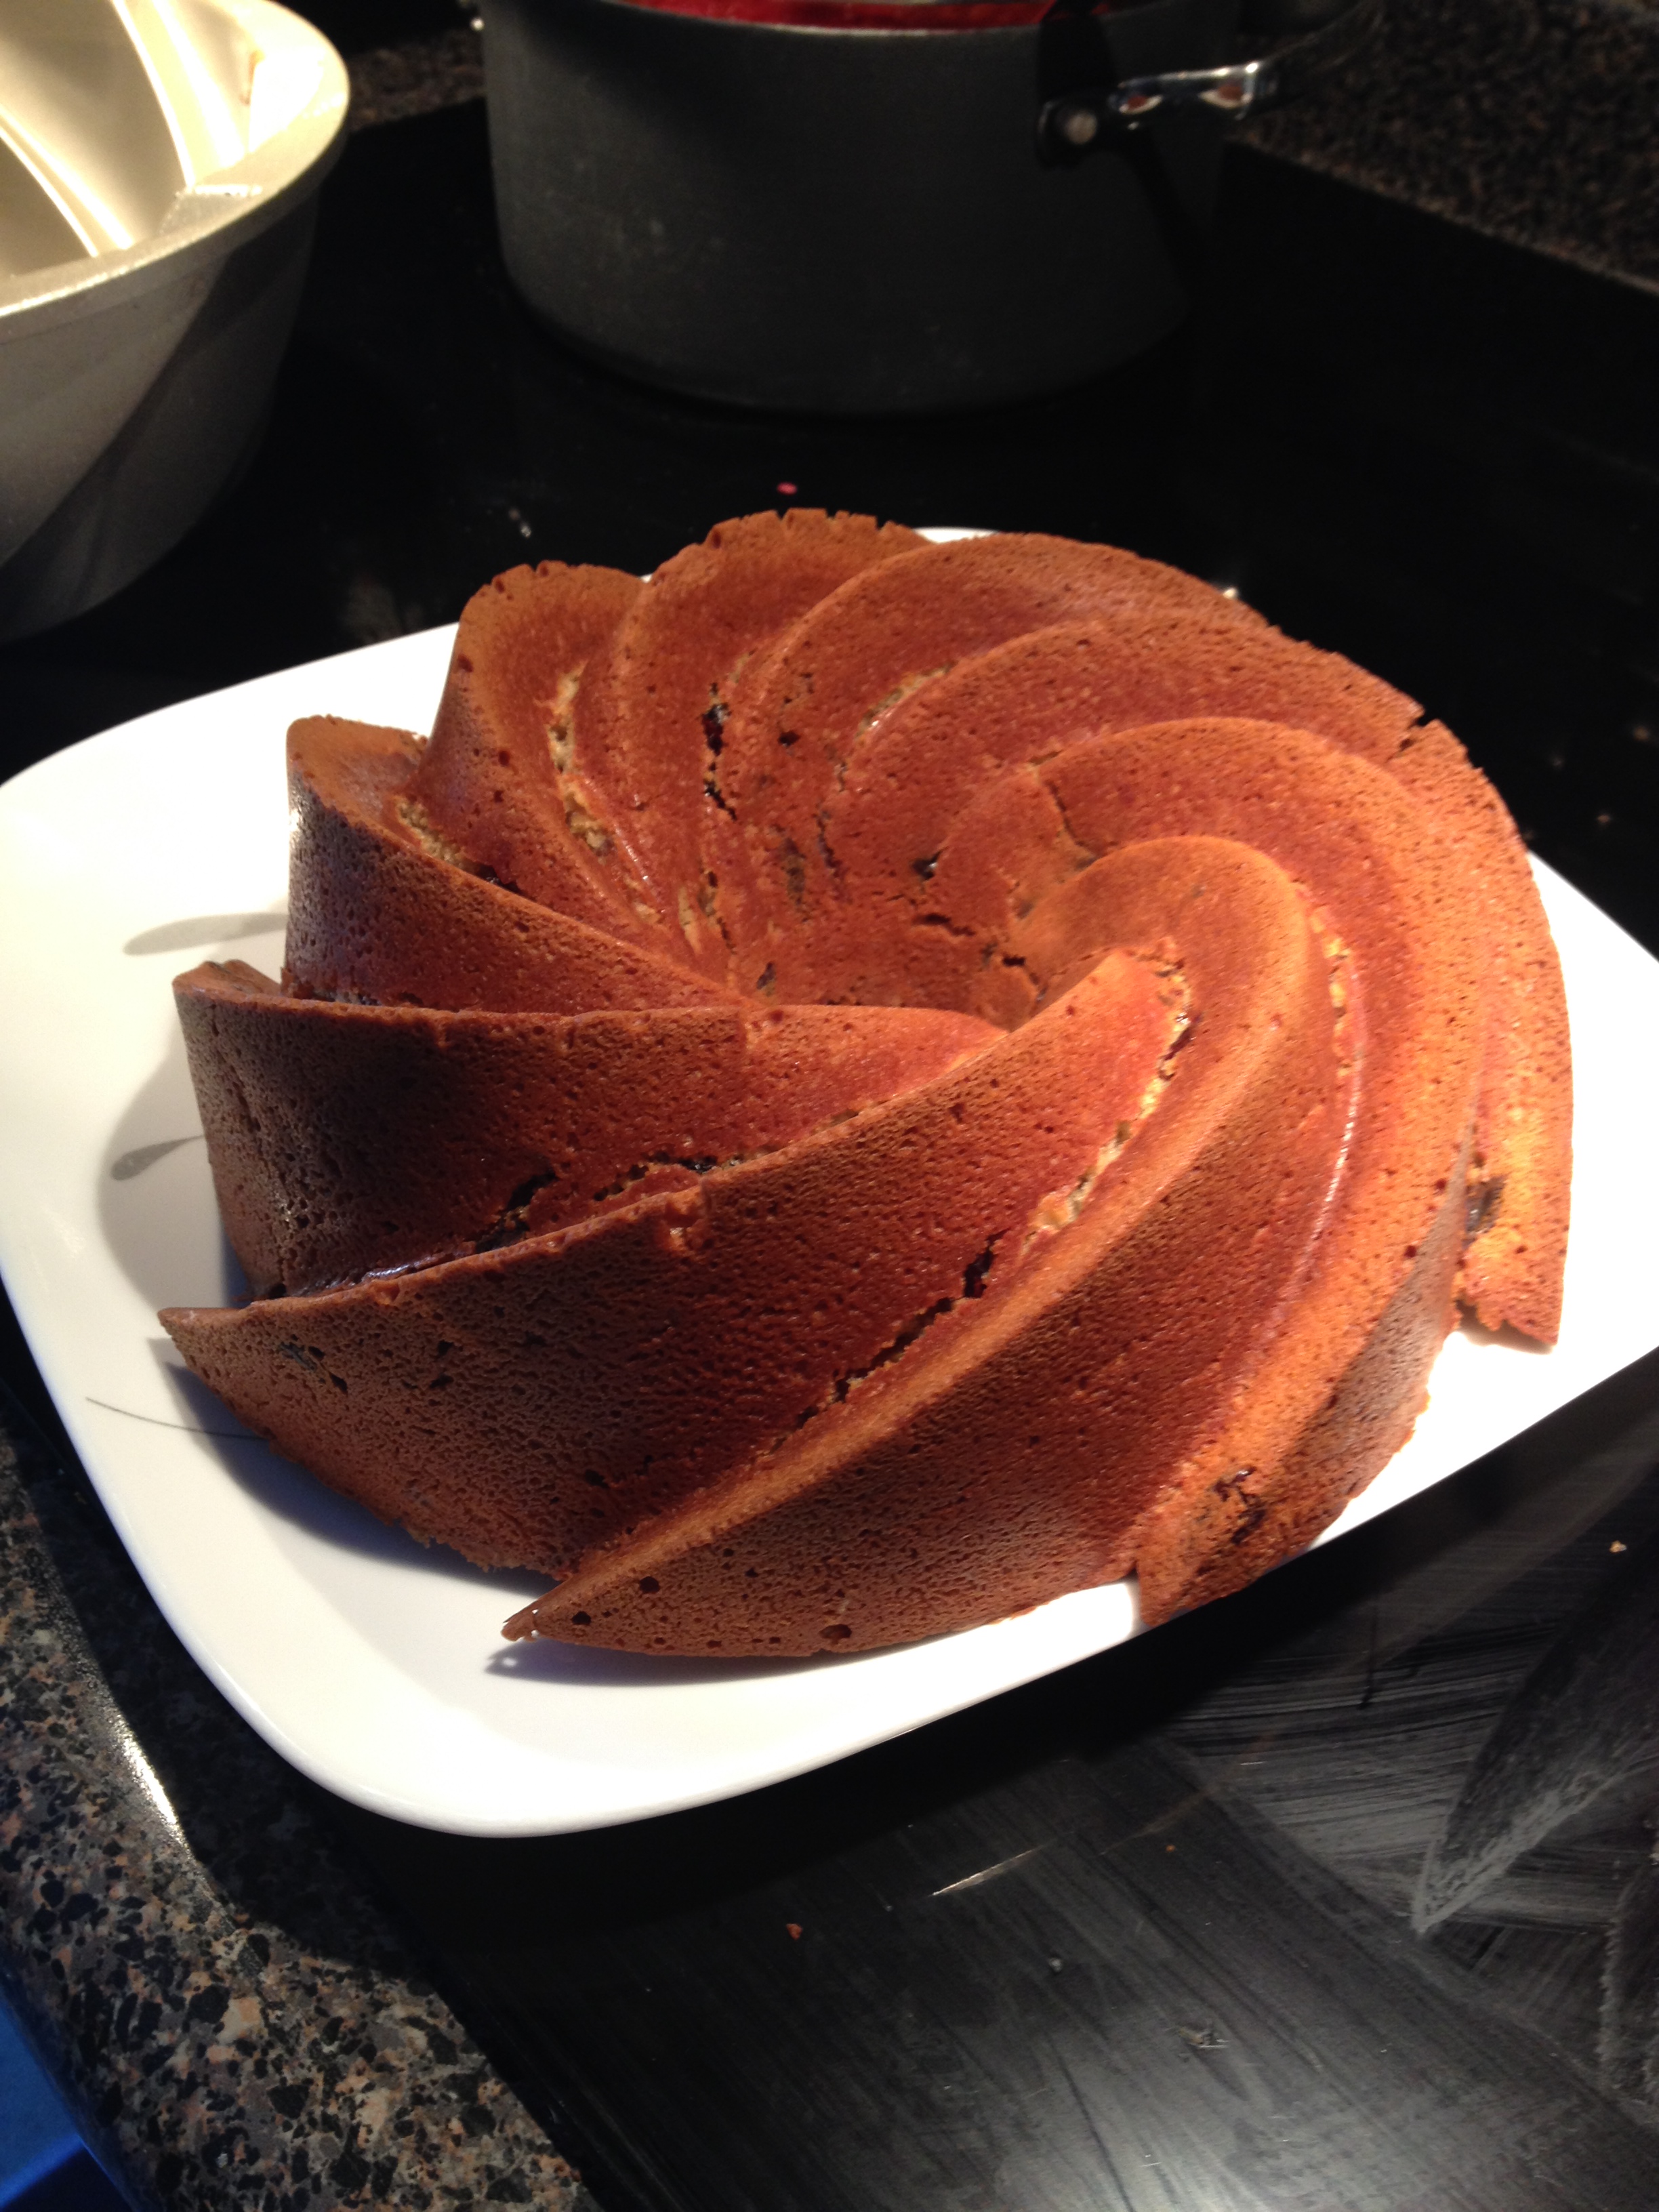
Dried fruits are nutritious, yummy and convenient, but look for dried fruits that have been dehydrated naturally and contain no sugar. Dried fruits also contains more fiber than the same-sized serving of their fresh counterparts. And as we all know fiber helps keep your digestive system running smoothly. Dried apricots, for example, contain 6.5 grams per cup, while fresh apricots contain just 3.1 grams.
For this recipe, I used dried apricots and cranberries for the topping, however you can use anything you like: dried cherries, blueberries, mango, fig, plum, pear etc.
This recipe also calls for kefir, which is a great way to add some pro-biotic into your diet.
Cakes generally are not associated with health, however I'm a strong believer in the "spoil yourself once in a while instead of overindulging later". Plus, there is always a way to modify a dessert recipe for guilt free indulgence. For example, there are ways to substitute for the butter, like apple sauce or even an avocado. Also, there are many ways to substitute your flour: almond flour is my favorite.
Here is the recipe:
Ingredients:
- 1.5 cups of kefir (I used a flavored Wildberry kind, but you can use whatever flavor or plain kefir)
- 1 tsp. baking soda
- 2 eggs
- 1.5 cups of brown sugar
- 1 stick of melted organic pasture-raised butter (substitute apple sauce or even avocado here)
- 3 tbsp. of olive oil
- 1 tsp. vanilla extract
- Zest of an orange
- 2 cups of all purpose or cake flour (you can substitute for almond flour if you are brave and verse in your conversions)
- ½ cup of dried cranberries
- ½ cups of dried apricots (diced)
Directions
- Preheat oven to 350
- In a medium bowl, combine kefir and baking soda. Set aside
- In a large bowl, mix eggs and sugar on high for 2 minutes, add butter (apple sauce or avocado), olive oil, vanilla, orange zest and mix well.
- Add the kefir mixture. Mix to combine
- Add flour. Mix well, making sure there are no clumps
- Fold in the dried fruit
- Pour into a beautiful cake mold pan and bake for 1 hour or until a toothpick comes out clean
Enjoy!

Tuna & Spinach Salad
This is one of the easiest and healthiest salads to put together as an addition to any meal. Spinach is high in Vitamins C & E, as well as anti-inflammatory benefits. Spinach is an excellent source of other antioxidant nutrients beta-carotene, and manganese — as well as a very good source of the antioxidant zinc and a good source of the antioxidant selenium.
Tuna is an excellent source of high quality protein, are rich in a variety of important nutrients including the minerals selenium, magnesium, and potassium; the B vitamins niacin, B1 and B6; and perhaps most important, the beneficial omega-3 essential fatty acids.
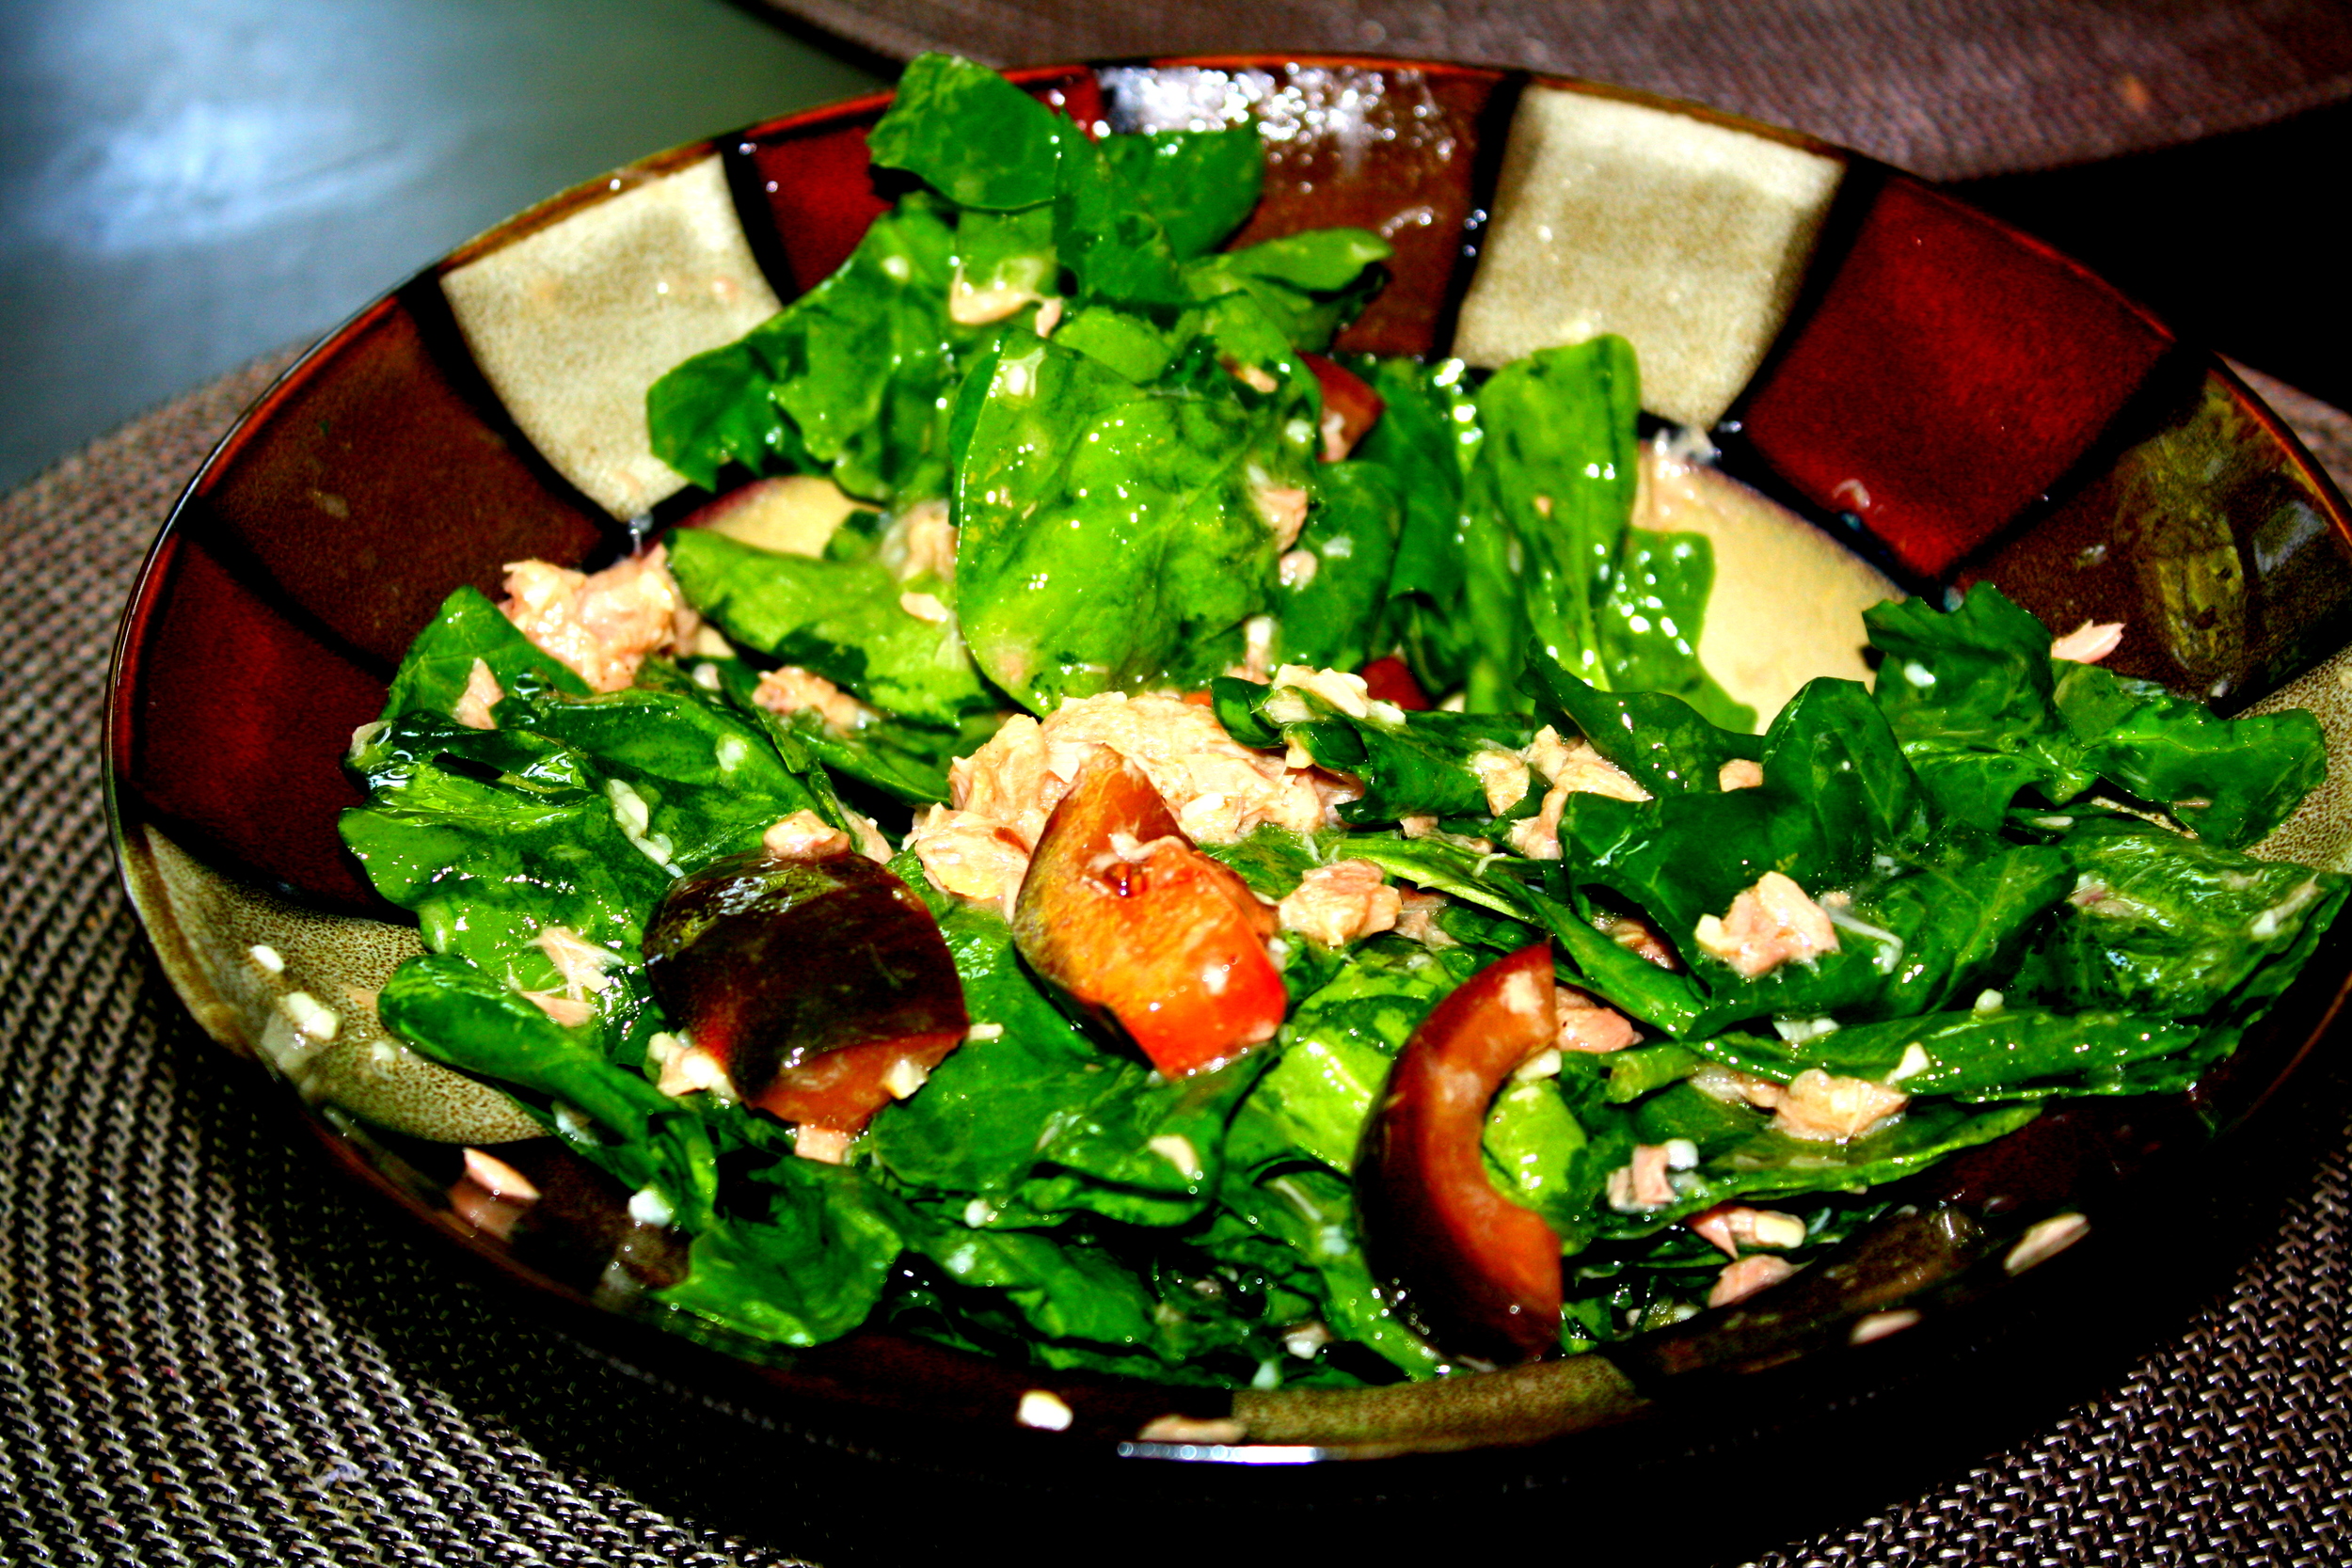
Ingredients:
- 6 cups of baby spinach
- 5 oz of pouched tuna
- 2 tbs of olive oil
- 2 tsp of lemon juice
- 1 clove of garlic (or more if you are a garlic lover like myself)
- sea salt & pepper to taste. I go easy on the salt, because of most of the time the canned tuna is already salted enough
- 1 tomato diced (I used the kumato, the purple kind)
Ingredients:
- Combine the olive oil, lemon juice, garlic, and salt and pepper to taste in a small sauce pan and heat until warm.
- Drizzle over spinach leaves and top with tuna and tomatoes and serve
This warming salad is making me hungry just writing about it. Go make some!

Kale with Lemon & Garlic

You couldn't get any healthier than these 3 ingredients, especially if you saute it in coconut oil. This healthy recipe is sure to have you craving for more! TIP: Lemon juice helps increase absorption of iron in greens, like kale, so if you can splash a little bit of fresh squeezed lemon juice on ALL your greens from now on, AWESOME!
Ingredients
- 2 large handfuls kale
- 2 tablespoons coconut oil
- a little olive oil
- 2 cloves garlic (or more if you are a huge garlic fan, like myself!)
- a little lemon zest juice of half a lemon
Directions
- Wash the greens and set them aside. Bring a pan of water to a boil, salt it lightly, and cook the greens for no longer than a minute or two. They must retain their crispness and vigor. Drain and set aside.
- Meanwhile, warm the coconut oil in a shallow pan, peel and crush the garlic, and add it to the pan with coconut oil. Add a little grated lemon zest (a couple of teaspoons should suffice), then, squeeze in the lemon juice.
- Lower in the greens and toss them gently in the hot, lemony garlic oil. Serve immediately and enjoy!

Quinoa Salad with Beans, Avocado & Lime-Cumin Dressing
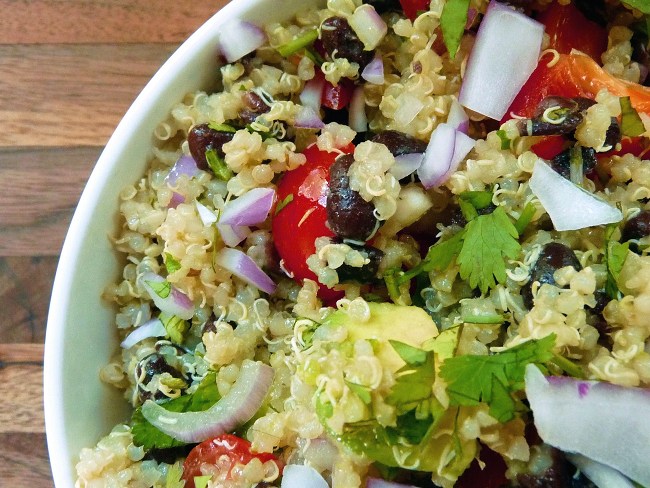
This is one of my favorite and easiest salads to prepare. Not to mention powerhouse of nutritious ingredients. Quinoa is high in protein, includes all nine essential amino acids, which makes it a great choice for vegans.
Because quinoa is a very good source of manganese as well as a good source of magnesium, folate, and phosphorus, this "grain" may be especially valuable for persons with migraine headaches, diabetes and atherosclerosis.
Ingredients
- 1 cup dry quinoa, rinsed
- 1 tbsp coconut oil
- 1 3/4 cup water
- 1 can black beans, drained and rinsed
- 1 avocado, chopped into chunks
- handful cherry tomatoes, quartered
- 1/2 red onion, diced
- 1 small clove garlic, minced
- 1 red bell pepper, chopped into chunks
- small handful cilantro, diced
- 1 limes, juiced
- 1/2 tsp cumin
- 1/2 tbsp olive oil
- salt, to taste
Directions
- Warm the coconut oil in a medium saucepan over medium heat. Once it’s hot add the rinsed quinoa and toast for about 2-3 minutes until it starts smelling nutty and lovely. Add water, stir once, cover, and simmer with a lid on for 20 minutes.
- While the quinoa is cooking, prepare all other ingredients. Prepare the dressing by combining the lime juice, oil, cumin, and salt. Whisk it aggressively. Adjust seasoning as necessary.
- When the quinoa has finished cooking, remove it from heat and fluff with a fork. Add black beans and toss to warm them through.
- Let the quinoa cool for about five minutes and then add all the remaining ingredients, including the dressing, and mix. Adjust seasoning if necessary. Serve with tortilla chips and a refreshing, cold beer.